
Configuration
wetator.config
The file wetator.config is the single point of configuration for Wetator. In this configuration file you have to define some defaults for the Wetator test environment. You can configure
- the base url (the root for all relative urls)
- the browser you like to emulate (Firefox or IE)
- the accept-language header Wetator uses (control the language of the simulated browser)
- the directory for the report output
- as many xml templates you like to generate all reports you (or your boss) needs
- all the info you need to pass to your proxy
- authorization credentials for HTTP basic out or NTLM
- the timeout Wetator will wait for JavaScript jobs to complete
- variables, you can use in your tests
- additional command sets (a way to add your own commands) together with their config parameters
- additional scripters (if you like to make Wetator able to read your own input format)
- ActiveX object mocks (if you like to make Wetator able to simulate ActiveX objects)
The file format is the usual windows property file format; '#' at the beginning of a line marks the line as a comment.
Every line has the form <key>=<value>.
Expand one of the sections below for more details.
Base Url (wetator.baseUrl)
Defines the base url for all relative url's in your test scripts. Usually this is the url (and maybe the fixed part of the context path) of the machine/application under test.
This property makes your tests independent from the server your application runs on.
It is possible to overwrite this property to use this configuration file for different stages (test, qa).
Browser (wetator.browser)
Wetator executes every test case for every browser defined by this property. The value of this property is a comma separated list. Possible values are:
- Firefox_ESR
- Firefox
- Chrome
- Edge
Browser Language (wetator.acceptLanguage)
Every browser send a special 'Accept-Language' header to the server to inform about the language preferences of the user. Usually this depends on the language setup of your operating system. But it is possible to define/overwrite this as part of the user setting of your browser. By setting this property you can fine tune the header to test special setups for users from different countries.
File Upload Mime Types (wetator.uploadMimeType)
When uploading files the browser tries to detect the mime type submitted as part of the upload request based on the extension of the file. Every browser has a hard coded list of such mime types but, if the extension is not found, the browser interact with the operating system to determine the mime type based on the installed software. Use this setting to configure your simulated browser to e.g. detect MS Office mime types.
Mock ActiveX Objects (wetator.browser.activeXObjects)
HtmlUnit supports ActiveX object mocks to let you simulate special plugins required for your application. For every ActiveXObject (class) you have to write your own mocker Java class and add it to the class path. For more details have a look at the HtmlUnit documentation.
Report Output Directory (wetator.outputDir)
The directory used to store the xml result file and all the page snapshots. This directory is also used for all the XSL Templates (see wetator.xslTemplates) as output directory.
You can use a relative or an absolute directory path. For relative paths, the path is relative to the location of the config file.
If the directory does not exist, Wetator will create it.
Set the property 'wetator.distinctOutput' to true if you like to have a distinct subdir for every test run.
Report XSL Templates (wetator.xslTemplates)
After the whole test suite is processed, Wetator can execute XSL transformations of the result file (xml) to produce nice reports.
This property holds a comma separated list of xsl template files.
You can use a relative or an absolute files. For relative paths, the path is relative to the location of the config file.
Proxy Configuration (wetator.proxyHost, wetator.proxyPort, ...)
If you want to test an application behind a proxy, set these properties.
wetator.proxyHost=[name or ip of the proxy]
wetator.proxyPort=[port]
Sometimes you have to not use the proxy for some host
wetator.proxyHostsToBypass=[list of host names separated by |]
and finally some proxies require an authentication
wetator.proxyUser=[proxyuser]
wetator.proxyPassword=[proxypassword]
Basic Authentication (wetator.basicAuthUser, wetator.basicAuthPassword)
If your application under test requires basic authentication, then you can define the user here.
wetator.basicAuthUser=[user]
wetator.basicAuthPassword=[password]
NTLM Authentication (wetator.ntlmUser, wetator.ntlmPassword, wetator.ntlmWorkstation, wetator.ntlmDomain)
If your application under test requires NTLM authentication, then you can define the client info here.
wetator.ntlmUser=[user]
wetator.ntlmPassword=[password]
wetator.ntlmWorkstation=[workstation]
wetator.ntlmDomain=[domain]
Additional Command Sets (wetator.commandSets)
It is possible to extends the list of command by adding your own. Commands are grouped in CommandSets.
Two additional command sets are already available (as part of the wetator.jar):
- org.wetator.commandset.SqlCommandSet (commands for sql database access e.g. for setting up your testdata)
- org.wetator.commandset.IncubatorCommandSet (command not yet part of the default command set but you can use it to play with this)
Define all your command sets (classes) here as comma separated list.
There is no need to register the built-in default command set (org.wetator.commandset.DefaultCommandSet) here.
WPath Separator (wetator.wpath.separator)
The separator used for splitting the WPath into parts.
Default is '>'.
Additional Control Support (wetator.controls)
Sometimes some companies use additional web controls (usually plugins). Because Wetator is based on HtmlUnit, there is no easy way to support these plugins.
But you can write your own support for this (e.g. a simulation of the features). These additional controls are handled the same way as any other control.
Define all your control (classes) here as comma separated list.
Additional Scripters (wetator.scripters)
Scripters are the way to support different input formats. Excel and (our) XML format are supported out of the box.
Define all additional scripters (classes) here as comma separated list.
JavaScript Timeout (wetator.jsTimeout)
The timeout in seconds Wetator will wait for JavaScript jobs to complete after the execution of an action.
This setting is optional; if not defined 1s is used.
JavaScript JobFilterFile (wetator.jsJobFilterFile)
Requires version 1.1
The name of the file that contains filter definitions for JavaScript jobs.
This feature is helpful for applications using some kind of heartbeat jobs (e.g. Vaadin). Usually Wetator will wait after each action until all JavaScript jobs are finished or the jsTimeout is over. The jsJobFilter let you exclude some jobs from this wait.
You can use a relative or an absolute directory path. For relative paths, the path is relative to the location of the config file.
The filter file syntax is quite simple; lines starting with '#' or empty lines are ignored. Every other single line defines a filter.
This setting is optional; if not defined no filters are active.
Example
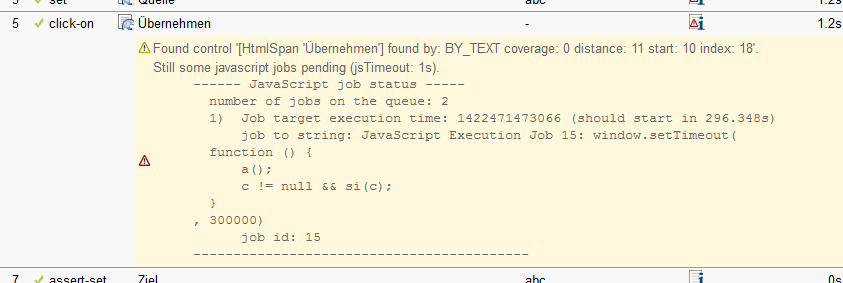
You are testing a Vaadin app. Your result output contains many warnings stating "Still some JavaScript jobs pending".
Enable the use of a jsJobFilterFile in wetator.config
wetator.jsJobFilterFile = js_filter.cfg
Place an empty file named 'js_filter.cfg' in the same directory as wetator.config.
Add a filter definition to the filter file
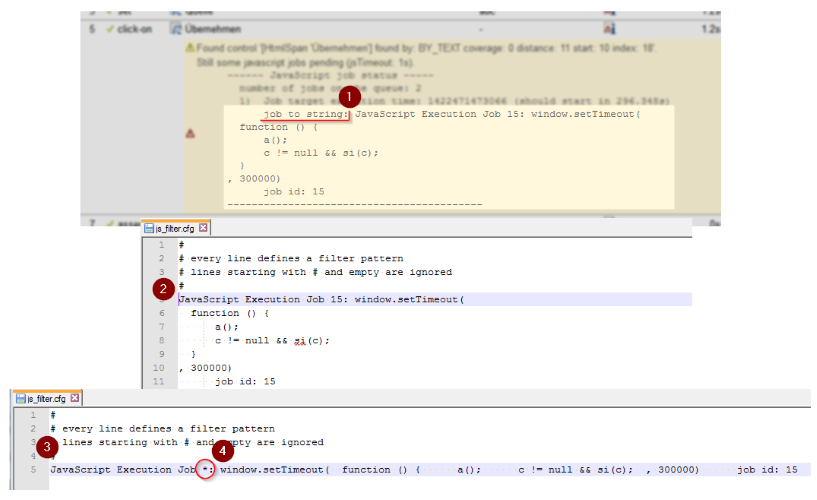
1. Open your result output and locate the string representation of the pending job.
2. Copy the string into your filter file (js_filter.cfg).
3. Remove all line breaks (but do not remove any blanks).
4. Transform the string into a pattern by replacing dynamic parts like counters by '*'.
The filter uses the same simple pattern language as the commands ('*' and '?'). You are free to build more sophisticated filters by replacing more parts with these wildcards.
HTTP Timeout (wetator.httpTimeout)
The timeout in seconds Wetator will wait for HTTP responses.
This setting is optional; if not defined 90s is used (same as real FF).
Typing Speed (wetator.typingSpeed)
The simulated typing speed of the user in keystrokes per minute.
Sometimes every keystroke for an entry field triggers some javascript. Usually the javascript code was written and tested by real users and because of this writing from wetator at full speed might break this javascript event handlers.
This setting is optional; if not defined 200 (keystrokes per minute) is used.
Retrospect (wetator.retrospect)
This is for debugging only. If enabled, Wetator will write detailed logs for the specified number of steps before the error occurs.
Enabling this requires log4j inside your classpath.
Enabling this will change the log level for org.apache.http.wire to TRACE. Take care that all your appenders for this logger have a proper threshold defined.
This setting is optional; if not defined -1 (disabled) is used.
Variables You Can Use in Your Tests
Variables are defined as part of the configuration.
The definition starts always with a '$' sign.
You can refer to this variable from all command parameters with the expression
${var-name}
Examples
Use parameters defined in wetator.config
  $title=My Title
  $app_user=dobby
| Command | Parameter | Optional Parameter | |
|---|---|---|---|
| assert-title | ${title} | ||
| assert-content | Hello ${app_user}. |
Do not show parameter values in the output (reports)
Sometimes you do not want to have the value of a variable visible in the reports or log files (e.g. passwords). This is possible if you prefix the variable name with '$$'. Then Wetator marks the variable as secret and outputs '****' instead of the value.
  $app_user=dobby
  $$password=secret
It is possible to define or redefine variables based on system properties.
After reading the variables from the configuration file, Wetator detects all system properties starting with '$'.
If there is already a variable (defined from the configuration file) it will be overwritten, otherwise the variable
will be added.
If you are not sure about the current setup the report list the actual state of all defined variables.
Redefine variable $title using a JVM argument
VM argument
-D$title=SpecialTitle
| Command | Parameter | Optional Parameter | |
|---|---|---|---|
| assert-title | ${title} |
Overwrite properties
It is possible to overwrite all properties. For more see Command-Line Options or Ant Task
Redefine wetator.baseUrl using a JVM argument
VM argument
-Dwetator.baseUrl=http://localhost:8081
All options are also documented in detail in the configuration file itself. Please have a look at the file 'templates\wetator.config' contained in the Wetator bundle.